Fresh Guitar Chord Ideas - Part 2
In the 1st
part,
we expanded on the idea of using open
strings in guitar chords,
moving cut-down chord shapes up the neck and effectively "floating"
them among the open strings. We learned some interesting and unique
chord voicings this technique allows us to create.
Let's experiment a bit more with this idea.
Floating other familiar guitar chord shapes
Without wanting to throw out any kind of structure to our learning, it was a good idea to start with floating those familiar chord shapes we learned in previous lessons by cutting them down to allow certain open strings to ring out.
In the 1st part we looked specifically at the cut down E shape, but the floating technique also works for other shapes.
Take the basic C shape barre chord for example:
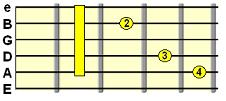
Now, like we've done in the previous lesson, let's cut that barre shape down to make the top 2 strings open. This is what we're left with:
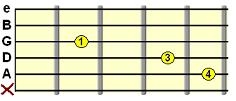
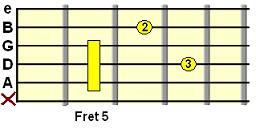
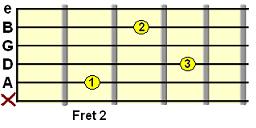
So, like before, let's try floating that cut down shape up the fretboard with those top 2 strings left open. I find the following positions most "compatible":
Click the diagram to hear example.
Interesting! We know from earlier lessons that the A string root note in the C shape tells us the key of the chord. For example, the fret 5 position would be an alteration of D major. The fret 8 position would be an alteration of F major. Including the open strings modifies what would be the regular C shape barre chord at those positions.
Tip: similar to above, you could also use the cut down minor C shape, including the top 2 strings open, and investigate which positions up the fretboard would be compatible.
Let's stay with the C shape for another example.
Remember the Cmaj7 open shape from a previous chord lesson? Here's a reminder...
In that shape, the G, B and high E strings are played open, so let's try moving that shape up the fretboard, keeping those open strings intact:
How about the minor 7th shape? Here's the standard, A barre form for that (which again, you should be familiar with!):
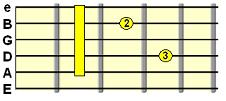
I find even just leaving the high E string open, we can use the first 4 strings of that shape and get some interesting voicings up the fretboard. For example, Dm7 at fret 5 can become a more interesting Dm9 (the open high E providing the 9th):
Or leaving the G and high E strings open from the shape at the 2nd fret:
Include the low E string in that shape above and you get an Em7 variation (Em7add9 to be exact), as the Low E becomes the main root note:
This is how you should experiment and discover new chords! Don't just copy me, there are tons of these "hidden" chords waiting to be found.Floating diads
Diads are basically two notes played together, as opposed to a chord which is 3 (triad) or more notes.
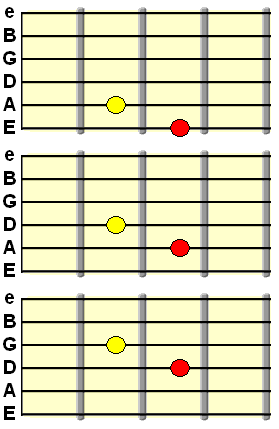
Apart from the root-5th diad (the powerchord), there is a major diad (root + major 3rd). This is also known as a major 3rd interval...
And a minor diad (root + minor 3rd), also known as a minor 3rd interval...
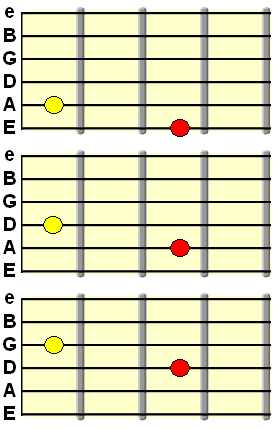
Notice how in both diagrams, the diad shapes can sit on any of the 3 main root strings - E, A and D. The red dot represents the root note of that diad. When floating these shapes, you don't have to always use all 6 strings, especially when using the low E string diad.
So play around with those shapes, moving them up and down, mixing major and minor, and of course trying different open strings in the mix. I find picking the strings rather than strumming works most effectively with this type of chord, as this allows you to skip over unwanted open strings. You might be surprised at what you come out with.
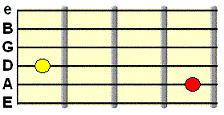
If you want to get really creative, try adding and removing fretted strings to those basic diad shapes, to see how you can interact with any open strings. Also, try widening the gap between fretted notes, like so...
Floating other guitar chord shapes
Previously, we've been using the top 2 or 3 open strings in our floating shapes, but we can also effectively "sandwich" open strings in between chord shapes. Let's take a quick look.
To show you the creative process behind this technique, I'll be playing a simple sequence using a modified A shape barre chord. First, here's how it has been modified:
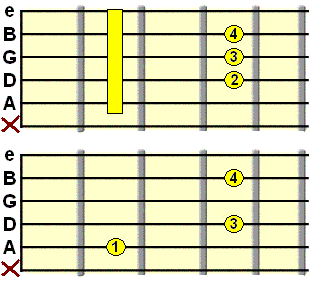
So just the G string has been unfretted to leave it open within the shape. You could do the same with the minor A shape...
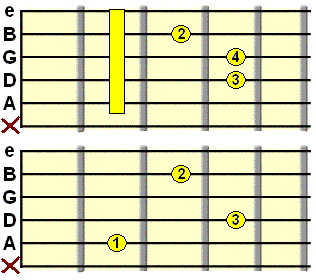
Now it's just a case of finding some "compatible" positions for these two shapes. The below tab is a nice example (click the tab to hear):
See, even just using a single open string, we can create some interesting movements. The open string merges through the chord changes as a sort of drone note, so it never becomes an overbearing tone.Play around a little with open strings in your chords - the worst that can happen is you'll learn which positions to avoid!
Time for a well deserved break...
We could spend hours just
exploring this one technique,
but I think you get the idea... and you can now use this knowledge to
explore the fretboard independently.
Of course, this type of chord is not supposed to replace
the use of the more basic chord shapes. Sometimes a simple major chord
in its regular form is the best option for the emotion you're trying
to convey in the music. In other words, you don't always need to use
"big sounding chords" to make your music sound good.
What we can be confident with is that we have yet another creative
option
to think about and draw from when writing our chord progressions. So,
as always, use it wisely!
| |
Tweet |
Sign up to the newsletter for updates and grab your free Uncommon Chords book
Related Guitar Chord Progressions


