Home > Lead
/ Scales
>
Bending in Scales
So we're now thinking more carefully about note selection before we apply a bend. Bending in scales is about giving your soloing phrases more "feel". A lot of the emotion and expression you hear in those epic guitar solos is down to effective and timely use of bends, among other ways of punctuating and ornamenting scale phrases.
For example, take this "before and after" example. The first example is simply picked with no embellishment whatsoever, whereas the second uses four simple bends to bring it to life. Click the tabs to hear...


That second interpretation should get you pulling those "guitar faces"!
Note that b means "bend to" and r means "release bend". This was covered in the basics lesson.
As you can hear, I'm not doing anything particularly elaborate, but even subtle bends make those slower, more drawn out phrases, which would otherwise sound a bit empty and lifeless, sound more expressive. In short, it's about "saying" more with fewer notes.
Fret 10
In the below example, I've targeted the minor 3rd (b3) on the high E string (13th fret). Again, click the tabs in this lesson to hear...

Now, if you look at that target note's position in relation to preceding notes on the same string, we could make a simple, half step bend from the major 2nd (2) as follows...

It's up to you how quickly you make the bend. It could be slow and gradual or quick enough that you barely hear the original note before the bend. This will depend on a number of things, such as the tempo of the track and the note values you are playing (quarter notes, eighth notes, sixteenths etc.).
You can also make the bend immediately or delay it and hold on to that pre-bent note a bit longer. An immediate bend, for example, would typically only count as one note (the note at the peak of the bend), whereas a delayed bend would count as two notes as the note before the bend will have more time to sound.
Listen to the difference: immediate bend (3 note phrase) - delayed bend (4 note phrase)
Let's try the same phrase an octave lower...

Again, our minor 3rd target note (10th fret) was arrived at from a bend.
We could also release the bend back to the preceding major 2nd, but if we're going to do this, we need to decide if we're going to hold or stop that released note (marking the end of a phrase) or continue the phrase further to a new target note. In the example below, I'm just holding it...

That sounds ok to my ears. What I might do though is embellish this phrase further and reaffirm that target note with another bend...

This is an example of the thought process you should use when bending in scales. The more you practice exploring scales in this way, the more "second nature" it'll be come and eventually you'll be able to improvise with it on the spot, knowing what creative options you have.
So, in summary - think about target notes and try bending (and releasing) to them from other notes in the scale.
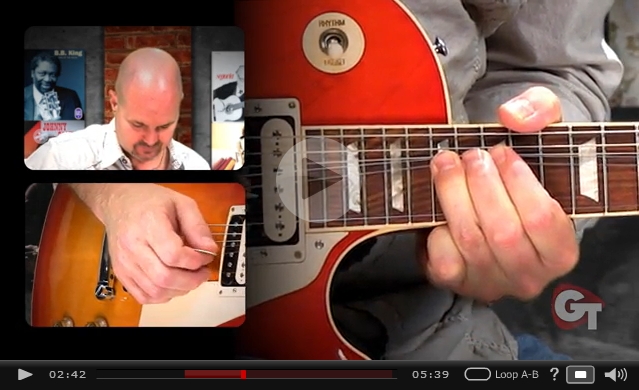
Tip: Try larger, more extreme bends in your scales where minor 3rd (one and a half steps) intervals are used. The below video takes you through the steps...
Basically, whatever our target note is, we pick it as usual, but we also bend to the same note on another string, either immediately before or after the picked note.
For example, using the harmonic minor scale again (unison notes in red)...

So there I repeated the target note on the B string by bending the G string immediately after.
It can also work the other way around - where we bend to a target note and then fret that same note on another string. For example...

So instead of holding the bend at its peak, we play the fully bent note on another string. We can then continue our phrase from that point or start a new phrase elsewhere.
This can also work well in a repeating phrase as follows (I've momentarily switched to minor pentatonic for this example!)...

Below is a pattern for the major (Ionian) scale spanning its first two positions. You can choose the root you want for the following exercise since the pattern is movable, but I'm using the root of C as an example.

Fret 8
All we're going to do is play along the entire scale pattern, first ascending and then descending back down, but instead of picking from one note to the next, we're going to bend from one note to the next.
What this will do is two things. It will be a good exercise for your fingers (you can use it as part of your warmup routine if you like) and it will train your ear to bend to the correct note pitches in a scale. To help with this, first pick the next note to get a pitch reference and then bend to it (see the tab below).
I've included a suggested fingering. Remember to get as many fingers you can behind the finger you're bending the string with. Obviously if you're bending with the index finger, that's not possible. That's why we only tend to use the index finger for smaller, half step bends.
First, the low E string. You can either bend and hold or release. Actually do both! Click the tab for an example.
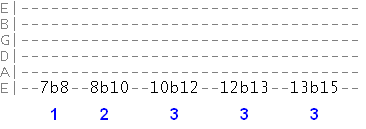
Then continue working up each string...
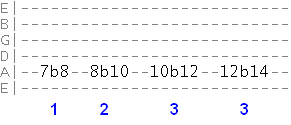
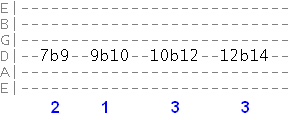
Etc. See if you can do the other 3 strings without help, based on the pattern from earlier.
And don't forget to try the same thing moving down the scale.
Test yourself. Try a similar exercise, but this time move around the scale in less linear, more unpredictable ways. For example, I might play the following sequence...

Try applying these exercises to other scale patterns you learn. While using consecutive bends like this is not typically useful for a solo (we don't want to over do it!), what this exercise does is get you thinking about where you are in a scale and the available notes for bending from several positions, so you'll be confident with bending no matter where you are on the fretboard.
Guitar String Bending in Scales
Once you're confident with the physical basics of guitar string bending, it's time to apply them in your solos. The most practical way of doing this is to apply bends to the scales you know.So we're now thinking more carefully about note selection before we apply a bend. Bending in scales is about giving your soloing phrases more "feel". A lot of the emotion and expression you hear in those epic guitar solos is down to effective and timely use of bends, among other ways of punctuating and ornamenting scale phrases.
For example, take this "before and after" example. The first example is simply picked with no embellishment whatsoever, whereas the second uses four simple bends to bring it to life. Click the tabs to hear...


That second interpretation should get you pulling those "guitar faces"!
Note that b means "bend to" and r means "release bend". This was covered in the basics lesson.
As you can hear, I'm not doing anything particularly elaborate, but even subtle bends make those slower, more drawn out phrases, which would otherwise sound a bit empty and lifeless, sound more expressive. In short, it's about "saying" more with fewer notes.
The basics of bending in scales
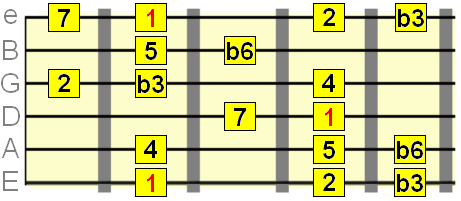
First, for the purposes of example, I'm going to pick a random scale, but the method we're about to look at applies to any scale you know/learn. Below is the D harmonic minor scale (since the root is on D). If you haven't spent any time on this wonderful scale, now is as good a time as any!
Fret 10
Target notes
There are many phrases we can build around that scale pattern, but we first need a target note. This is the note which we will bend to. Having a target note will help give our phrases and bends a sense of direction and purpose.In the below example, I've targeted the minor 3rd (b3) on the high E string (13th fret). Again, click the tabs in this lesson to hear...

Now, if you look at that target note's position in relation to preceding notes on the same string, we could make a simple, half step bend from the major 2nd (2) as follows...

It's up to you how quickly you make the bend. It could be slow and gradual or quick enough that you barely hear the original note before the bend. This will depend on a number of things, such as the tempo of the track and the note values you are playing (quarter notes, eighth notes, sixteenths etc.).
You can also make the bend immediately or delay it and hold on to that pre-bent note a bit longer. An immediate bend, for example, would typically only count as one note (the note at the peak of the bend), whereas a delayed bend would count as two notes as the note before the bend will have more time to sound.
Listen to the difference: immediate bend (3 note phrase) - delayed bend (4 note phrase)
Let's try the same phrase an octave lower...

Again, our minor 3rd target note (10th fret) was arrived at from a bend.
We could also release the bend back to the preceding major 2nd, but if we're going to do this, we need to decide if we're going to hold or stop that released note (marking the end of a phrase) or continue the phrase further to a new target note. In the example below, I'm just holding it...

That sounds ok to my ears. What I might do though is embellish this phrase further and reaffirm that target note with another bend...

This is an example of the thought process you should use when bending in scales. The more you practice exploring scales in this way, the more "second nature" it'll be come and eventually you'll be able to improvise with it on the spot, knowing what creative options you have.
So, in summary - think about target notes and try bending (and releasing) to them from other notes in the scale.
Tip: Try larger, more extreme bends in your scales where minor 3rd (one and a half steps) intervals are used. The below video takes you through the steps...
Unison bends
This technique was covered briefly in the string bending techniques lesson, but we need to work out how to apply it to scales.Basically, whatever our target note is, we pick it as usual, but we also bend to the same note on another string, either immediately before or after the picked note.
For example, using the harmonic minor scale again (unison notes in red)...

So there I repeated the target note on the B string by bending the G string immediately after.
It can also work the other way around - where we bend to a target note and then fret that same note on another string. For example...

So instead of holding the bend at its peak, we play the fully bent note on another string. We can then continue our phrase from that point or start a new phrase elsewhere.
This can also work well in a repeating phrase as follows (I've momentarily switched to minor pentatonic for this example!)...

Gutar scale bending exercises
When navigating a scale, you need to be constantly aware of where the next and preceding notes are. The same applies to bending in scales.Below is a pattern for the major (Ionian) scale spanning its first two positions. You can choose the root you want for the following exercise since the pattern is movable, but I'm using the root of C as an example.

Fret 8
All we're going to do is play along the entire scale pattern, first ascending and then descending back down, but instead of picking from one note to the next, we're going to bend from one note to the next.
What this will do is two things. It will be a good exercise for your fingers (you can use it as part of your warmup routine if you like) and it will train your ear to bend to the correct note pitches in a scale. To help with this, first pick the next note to get a pitch reference and then bend to it (see the tab below).
I've included a suggested fingering. Remember to get as many fingers you can behind the finger you're bending the string with. Obviously if you're bending with the index finger, that's not possible. That's why we only tend to use the index finger for smaller, half step bends.
First, the low E string. You can either bend and hold or release. Actually do both! Click the tab for an example.

Then continue working up each string...


Etc. See if you can do the other 3 strings without help, based on the pattern from earlier.
And don't forget to try the same thing moving down the scale.
Test yourself. Try a similar exercise, but this time move around the scale in less linear, more unpredictable ways. For example, I might play the following sequence...

Try applying these exercises to other scale patterns you learn. While using consecutive bends like this is not typically useful for a solo (we don't want to over do it!), what this exercise does is get you thinking about where you are in a scale and the available notes for bending from several positions, so you'll be confident with bending no matter where you are on the fretboard.
| |
Tweet |
Stay updated and learn more
Sign up to the newsletter for updates and grab your free Uncommon Chords book
Sign up to the newsletter for updates and grab your free Uncommon Chords book
More Lead Guitar Lessons


