Guitar Hammer Ons
In this lesson we'll do three main things: get introduced to hammer ons as a guitar technique, play around with some exercises to get all our fingers involved using different intervals, and finally we'll look at larger lead guitar phrases that use more than one "hammer".But first, for those of us who are new to this technique...
What are hammer ons?
As the name suggests, "hammering on" involves fretting a string as usual, but landing down on the string with more speed and force (like a hammer action!) so the note sounds without you having to pick it. Most often, the hammer on technique involves two or more fingers.
Simple! However, in a bit
we'll see there's more to
it than that...
Basic guitar hammer on exercises
The main thing we need to do is get all our fingers involved in the physical hammer on action. Beginners are often taught to hammer using the ring finger, but all fingers are at some point going to be required to hammer on in different positions throughout a solo...
A
practical way to begin is to use the minor pentatonic scale. Hammering
on up and down this scale is a useful exercise to get physically
used to the technique.
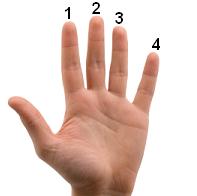 First,
familiarise yourself with
the basic, minor pentatonic box pattern...
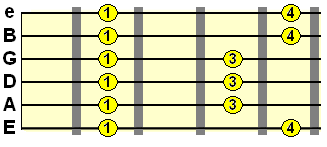
So, our index/1st finger will be the fretted base of each hammer on, on each of the strings. Starting with the low E string...
Fret your index finger at the 5th fret (it can be any fret really as this scale shape is movable, but we'll stick at fret 5 for this example). Pick the string as usual, but just after you've picked it, hammer your pinky/4th finger on to the 8th fret on that same string. It should look something like this...
The key thing is not how much force you hammer on with, but rather how quick your finger comes down on to the string. The hammered note needs to resonate cleanly.
Once you've hammered on, hold it there and assess how well the note rings out. If it decays too quickly, you'll need to adjust the speed at which your finger hammers on to the string. Keep referring to the videos in this lesson until you're happy with your technique.
When writing/reading tab, the h symbol tells us when a hammer on is used between two frets/notes. So this is how what we've just played would be tabbed out...

5th fret hammer on to 8th fret.
Let's now move to the next string up in this pentatonic shape - the A string. We're using exactly the same hammer on technique but this time we'll be hammering on with our ring/3rd finger.
Even though you're using a different finger, the technique is exactly the same.
Use the same index-ring technique for the D and G strings, and then we're back to the index-pinky hammer on interval for the B and high E strings.
Once you're confident with your hammer on technique one string at a time, try hammering your way up and down the pentatonic scale in an uninterupted sequence...
To really set in that "muscle memory", hammer around the scale pattern in varied, staggered patterns...
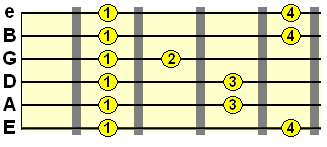
Now, we also need to get physically comfortable with hammering on between our index and middle/2nd finger. We can alter the pentatonic pattern slightly to accomodate this...

...and another addition - hammering on between our ring/3rd finger and our pinky/4th finger. I'll just modify that pattern further to accomodate this addition...
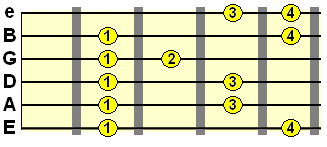

So now we have a sequence we can really work all our fingers up and down. It includes the most common hammer on intervals you'll come across within scales.
Make sure you work on these movements in different positions up the fretboard.
If you're looking for some good hammer on warmup exercises, try using the below intervals from high E to low E (and then back up, down, up etc.).
| Base finger | Hammer on to |
| index | middle |
| index | ring |
| index | pinky |
| middle | ring |
| middle | pinky |
| ring | pinky |
Using more than one hammer on per string
Once you're physically comfortable with the basic hammer on technique, you can move on to larger phrases by using more than one hammering finger across each string. When played at speed, this creates what is known as a "legato" effect. Rather than each note in a sequence being cleanly separated by a pick stroke, they slur into each other. Some guitarists refer to this effect a "roll".
When we come to learning pull offs, and mix both hammer ons and pull offs in the same phrase, this legato style of playing will be enhanced further.
A great scale pattern to experiment with this technique is the dorian box pattern...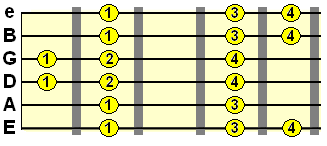
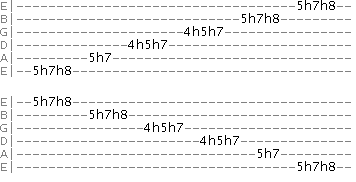
So, two hammer ons per string there (except for the A string). In fact, a lot of boxed scale patterns that use 3 notes per string will allow you to put this technique to use. Eventually, you'll be applying hammer ons fluidly, all over the fretboard.
Also don't forget to work on instances where two hammer ons might be used in tighter spaces, such as within three semitones as found within this extended blues scale pattern...
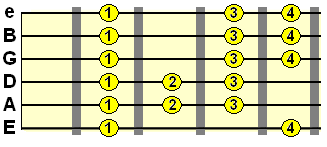

...and of course, once you learn scale patterns over a wider fretboard area, you'll be able to apply multiple hammer ons across wider areas. For example, this 3 notes per string pattern...
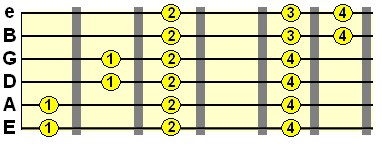

Don't forget to descend from high E to low E using these patterns as well.
Keep working on the exercises we've covered in this lesson and try and come up with some of your own. This is all about getting your fingers physically comfortable with the hammer on action. The more you work on it, the more confidently you'll be able to apply hammer ons in your solos.
| |
Tweet |
Related


