Palm Mute Guitar for Beginners
In this lesson I'll be going through some effective palm mute guitar techniques that will get you playing with expert timing and accuracy.

|
What is palm mute guitar?
Palm muting is a guitar technique used in all forms of music, but by far most religiously in rock and heavy metal.
It involves dampening the strings, not with your palm as the name suggests, but with the edge of your hand, and when coupled with high gain or distortion from your amp or effects pedal, you get a thick, percussive punch when you strike the strings.
Here's how to execute palm mute guitar...Hand positioning for palm mute guitar
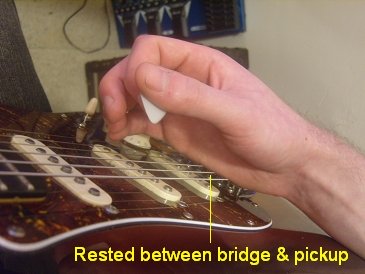
You should first rest the meaty part of
the edge of your picking hand between
the bridge and the first pickup - you should be able to feel
all 6 strings along the edge of your hand.
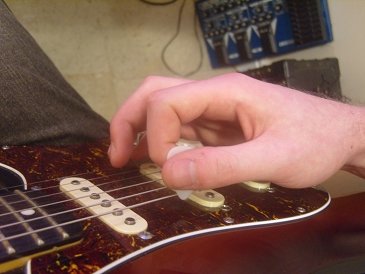
I say pivot, because your "palm" should stay fixed on that bridge area, only now angled around slightly.
What I tend to do is rest my pinky/little finger on the pick guard (you can just about see this in the photo on the left) to ensure I have all strings muted between the bridge and pickup.
With your picking hand, you want to strike the strings firmly to get a clean punch. Just a quick, sharp, percussive down pick like this.
That's a simple 4/4 timing there and you can just play the bottom E string to start with to find your sound. Of course, a metronome will help you to build up your speed gradually.How positioning affects palm muted tone
There is a way to define the "texture" of your palm muted riffs - how far your "palm" is positioned away from the bridge of your guitar. The further towards the guitar neck you mute the strings, the shorter and more percussive the mute sounds...
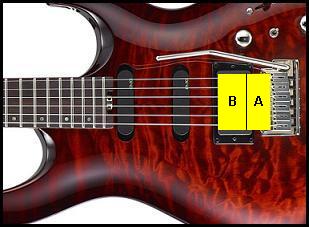
Position "B" pretty much over the bridge pickup, gets you a sharper, more percussive sounding mute - Click to hear
I mostly prefer a thicker sound, so my hand will rest almost on the bridge, but touching the strings just enough to partially mute them.Speeding up and finding your palm mute tone
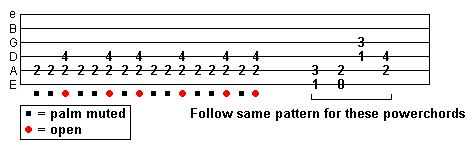
Once you feel you're up to speed with the above, take a look at the exercise below which is a little faster.
Click on the diagrams in this lesson to hear an example...
Changing string position whilst palm muting
The exercise above should have helped you to get that initial timing. But obviously if there's going to be any sort of movement in your music, you will need to change between different strings using this technique.
When changing to another string (e.g. changing from a powerchord on the 6th string to a powerchord on the 5th string), you need to keep your hand in the same position, partially muting the strings.
Only the joints in the fingers holding the pick will move to target the right strings.
Try this palm mute exercise with string changes...
Remember, the edge of your palm muting hand should hardly move whilst changing fretboard position.
Onwards and upwards!
Getting more inventive with palm mute guitar
As well as changing chord/strings whilst palm muting, you also need to be able to stop and start the muting in a riff to create more rhythmic effect.
Listen to the clip below and try and pick out when the muted downstrokes are applied and lifted (unmuted)...
This technique requires you to raise your hand off the strings at the appropriate time and then place it back in the same spot to mute.
To make sure this is accurate, only lift your muting hand off ever so slightly, but enough so you aren't muting the strings anymore.
Also, you need to synchronize removing your muting hand with a downstroke, so you hit the strings and pull your hand away almost at exactly the same time.
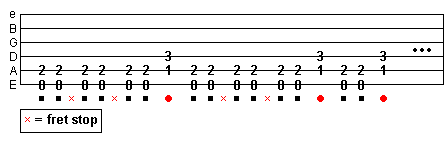
Try the exercise below...
So on the diagram above, the red dots indicate where you need to lift off (unmuted) and downstroke. Follow it slowly, and use a metronome to build up your speed gradually. It's the only way to nail it at speed!
Palm muted stops
If you hit the strings whilst palm muting normally, the chord or string will still ring for a while, so to cut this off and create a stop we need to fully mute the string.
The best way to do this is to bring your fret hand into the action. You can use the fingers on this hand to simply lift off the fretboard but still touch the strings that were in the chord. As soon as you raise your fingers to just touch over the strings, they will be fully muted.
If, however, you are playing an open string (not fretted) you will need to bring down some available fret hand fingers to touch the strings and stop them.
You can hear an example of this right here!
Now let's put this technique
to use with a stop-start riff. Again, red = unmuted.
Quick alternating between muted and non-muted strokes
As this is a very rhythmic style of playing, you can take it to another level and use your palm muting to enhance the attack and momentum of a riff.
This involves you simply palm muting the 6th string in between non-muted chords or notes. It should fill a gap so short in the riff that it merely becomes a percussive fill...
So again, we're using that muted/unmuted technique from the exercise before.
If you speed that up you get a better picture of how it works (click tab to hear)...
You can just about catch a deep punch effect when the muting is applied, which gives the riff a real charge. Start slow with a metronome and build up gradually.
Palm muting on single strings
Although this will be covered in more depth in the lead guitar section, it's important to be able to palm mute more than just power chords.
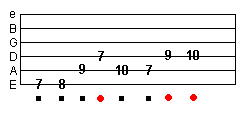
Looking at the simple lick below, the symbols show you, just like before, where muted and unmuted strokes are played. Listen to the audio and get a sense for the rhythm that this creates.
You'll want to try the above lick, or similar, using alternate picking (separate lesson!), because as you speed up it'll be the most efficient way to play it (as will most lead phrases).
So there's a beginner's guide to palm mute guitar! I hope you've learned a new technique that will stay with you throughout your guitar playing life. There are more advanced palm muting lessons back in the main section, or see the links below.
| |
Tweet |
Related
More Advanced Palm Muting
Fast Palm Mute Guitar
More Rhythm Guitar Lessons


