Home
>
Lead
/ Scales
>
Scale Exercises 2
The aim of this series is to get all your fingers moving in every possible way around a scale, so you'll be ready for any movement a scale pattern might throw at you. Some movements from one note to the next will be more awkward than others, and this lesson should prove challenging as far as developing your finger dexterity.
But the rewards will be immeasurable! Persevere and spend at least 10 minutes a day on each exercise in this lesson (one exercise per day), using a metronome to speed up gradually. Your speed and timing will improve quicker than you might think.
It involves moving from one string to the next on the same fret.
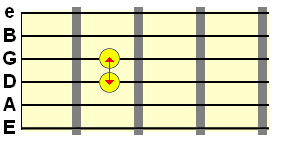 So
here we have to move down from either the G to D string or up from the
D to G string on the same fret.
This kind of vertical movement appears on every string in pretty much every scale pattern.
I'm just going to use the major scale as an example here, but you will find yourself using these movements in every scale you learn. This is just about getting physically used to awkward movements. Playing vertically also gives your phrasing a new direction (rather than simply playing in a linear, horizontal fashion).
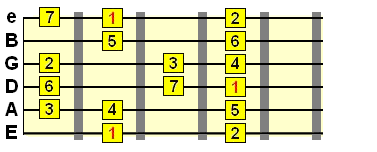
Within this pattern we can see several possible vertical movements, highlighted in the animation below...
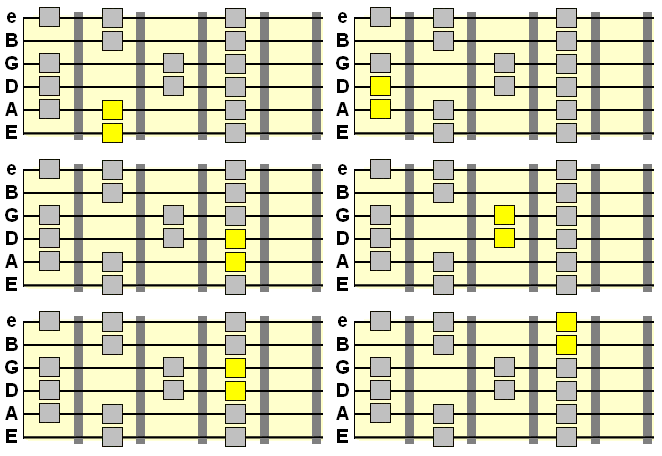
Now, there are many possible situations in which you'll be negotiating two consecutive notes in this way, but there are two ways of playing them, depending on where your fingers fall in that particular part of the scale pattern.
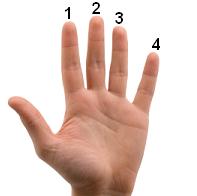 The
first is
to use one finger per note/string as usual. For example, we might
use the following fingers, remembering to cleanly separate each note
(the alternative is to play them together, which is known as a double
stop).
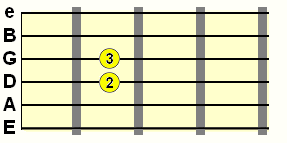
We're in the key of B for these exercises, but you can move these patterns to any fret depending on the key in which you're playing. Suggested fingering in blue. Play them in a repeating sequence (i.e. the last note leads straight back to the first).


How? By using a technique called rolling.
We literally roll the finger back or forward to fret the note below or above the preceding note on the same fret.
It's similar to a barre you might use when playing chords or double stops, but as the photos below show, instead of barring flat across the two notes, we only apply pressure to one string at a time in order to cleanly separate the notes. For example, if we were moving from the G to B string on the same fret, here's how it should be played...
Incidentally, this is the technique used when sweep picking arpeggios - it allows you to play two, even three vertical notes in quick succession.
It will take time and patience to master this technique, but keep at it, trying very subtle changes in your finger position on the string when rolling back. Eventually you'll be able to do it without thinking about it - just like you did with those first few chords.
Let's start with two notes within regular scale phrases, using the index/1st finger as our rolling finger...


Hopefully, after a few weeks of using exercises like those in this lesson, you'll start to use rolling as a way of keeping your finger movements more economical, which although subtle at slower speeds, will really help you negotiate vertical movements at higher tempos.
I hope you also experiment with mixing vertical movements with more linear runs, like those in the first part, to create more dynamic scale phrases.
But we're not done yet! The next part will introduce yet another fluid and musical way of navigating scales.
String Skipping Exercises
Guitar Interval Exercises
Learn Guitar Scales
Learn More Lead Techniques
More Scale Exercises for Guitar
In the first guitar scale exercises lesson, we looked at runs - linear, repeating ascending/descending note patterns that sound great as soloing flourishes and that you can apply to any scale you might learn.The aim of this series is to get all your fingers moving in every possible way around a scale, so you'll be ready for any movement a scale pattern might throw at you. Some movements from one note to the next will be more awkward than others, and this lesson should prove challenging as far as developing your finger dexterity.
But the rewards will be immeasurable! Persevere and spend at least 10 minutes a day on each exercise in this lesson (one exercise per day), using a metronome to speed up gradually. Your speed and timing will improve quicker than you might think.
Scale exercises set #2 - Vertical Movements
What do I mean by "vertical movements"? This is a very specific movement you'll be required to make, especially when navigating closed (or box) scale patterns.It involves moving from one string to the next on the same fret.
 So
here we have to move down from either the G to D string or up from the
D to G string on the same fret.
So
here we have to move down from either the G to D string or up from the
D to G string on the same fret.This kind of vertical movement appears on every string in pretty much every scale pattern.
I'm just going to use the major scale as an example here, but you will find yourself using these movements in every scale you learn. This is just about getting physically used to awkward movements. Playing vertically also gives your phrasing a new direction (rather than simply playing in a linear, horizontal fashion).

Within this pattern we can see several possible vertical movements, highlighted in the animation below...

Now, there are many possible situations in which you'll be negotiating two consecutive notes in this way, but there are two ways of playing them, depending on where your fingers fall in that particular part of the scale pattern.
 The
first is
to use one finger per note/string as usual. For example, we might
use the following fingers, remembering to cleanly separate each note
(the alternative is to play them together, which is known as a double
stop).
We're in the key of B for these exercises, but you can move these patterns to any fret depending on the key in which you're playing. Suggested fingering in blue. Play them in a repeating sequence (i.e. the last note leads straight back to the first).
| Get the print sheet for this lesson - includes tabs for all 11 exercises to read away from your computer/device. Download Here (PDF) |
Exercise 1

Exercise 2

Exercise 3
Now we're using our 1st and 2nd fingers in a vertical movement (the opening two notes)...
Exercise 4

Exercise 5
And finally the 3rd and 4th fingers in vertical movements...
Exercise 6

The art of rolling
As mentioned earlier, there is a second way of playing two vertical notes like this. It's a more economical way of playing such notes, because instead of using two fingers (one for each string/note), we only need one finger for both notes.How? By using a technique called rolling.
We literally roll the finger back or forward to fret the note below or above the preceding note on the same fret.
It's similar to a barre you might use when playing chords or double stops, but as the photos below show, instead of barring flat across the two notes, we only apply pressure to one string at a time in order to cleanly separate the notes. For example, if we were moving from the G to B string on the same fret, here's how it should be played...
On the G
(lower) string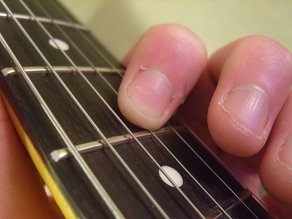 Start by fretting the lower string as usual, with the lower tip of the finger. |
On the B
(higher) string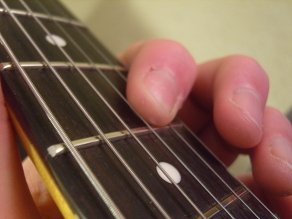 The finger collapses or "rolls" back to a flatter position, fretting the string above. |
Incidentally, this is the technique used when sweep picking arpeggios - it allows you to play two, even three vertical notes in quick succession.
It will take time and patience to master this technique, but keep at it, trying very subtle changes in your finger position on the string when rolling back. Eventually you'll be able to do it without thinking about it - just like you did with those first few chords.
Let's start with two notes within regular scale phrases, using the index/1st finger as our rolling finger...
Exercise 7
The grey box around the blue finger numbers indicates where the 1st finger roll occurs.
Exercise 8
This time we're rolling down from the D to A string. Same as before, but we just reverse the rolling action. So we start with a "rolled back" finger on the higher (D) string and move into the more upright, finger tip position on the lower (A) string. Again, it'll take time to perfect the action, and everyone's fingers are different so use trial and error to find the most comfortable and effective positioning.
Exercise 9
Rolling the 2nd finger...
Exercise 10
Rolling the 3rd finger...
Exercise 11
And finally, a 4th finger roll. Keep a close eye on that 4th finger action. Start slow and make sure the two notes are separated...
Hopefully, after a few weeks of using exercises like those in this lesson, you'll start to use rolling as a way of keeping your finger movements more economical, which although subtle at slower speeds, will really help you negotiate vertical movements at higher tempos.
I hope you also experiment with mixing vertical movements with more linear runs, like those in the first part, to create more dynamic scale phrases.
But we're not done yet! The next part will introduce yet another fluid and musical way of navigating scales.
| |
Tweet |
Stay updated and learn more
Sign up to the newsletter for updates and grab your free Uncommon Chords book
Sign up to the newsletter for updates and grab your free Uncommon Chords book
Related Lessons
String Skipping Exercises
Guitar Interval Exercises
Learn Guitar Scales
Learn More Lead Techniques


