Home
> Scales
/ Lead
> Scales Across The Neck
While you may be familiar with "boxed" and "three notes per string" scale patterns, you soon feel the urge to break out of these narrow limitations and span more of the neck. Knowing how to navigate (and physically endure) these larger roadmaps in a practical sense, musically and fluidly, is a skill in its own right.
This lesson will show you how to span beyond three octaves for a given scale, over a twelve (and more) fret radius, using fingerings that promote speed and fluidity. You could call this "shredding for beginners", because it lays the fret-hand groundwork for fast, yet melodic runs...
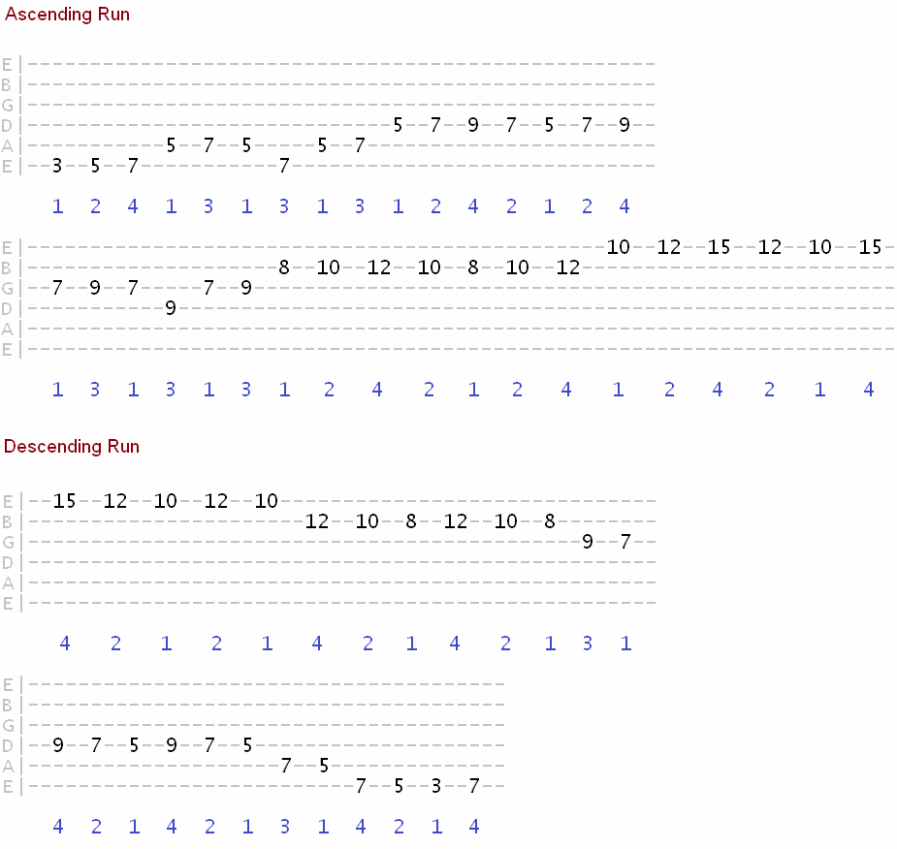
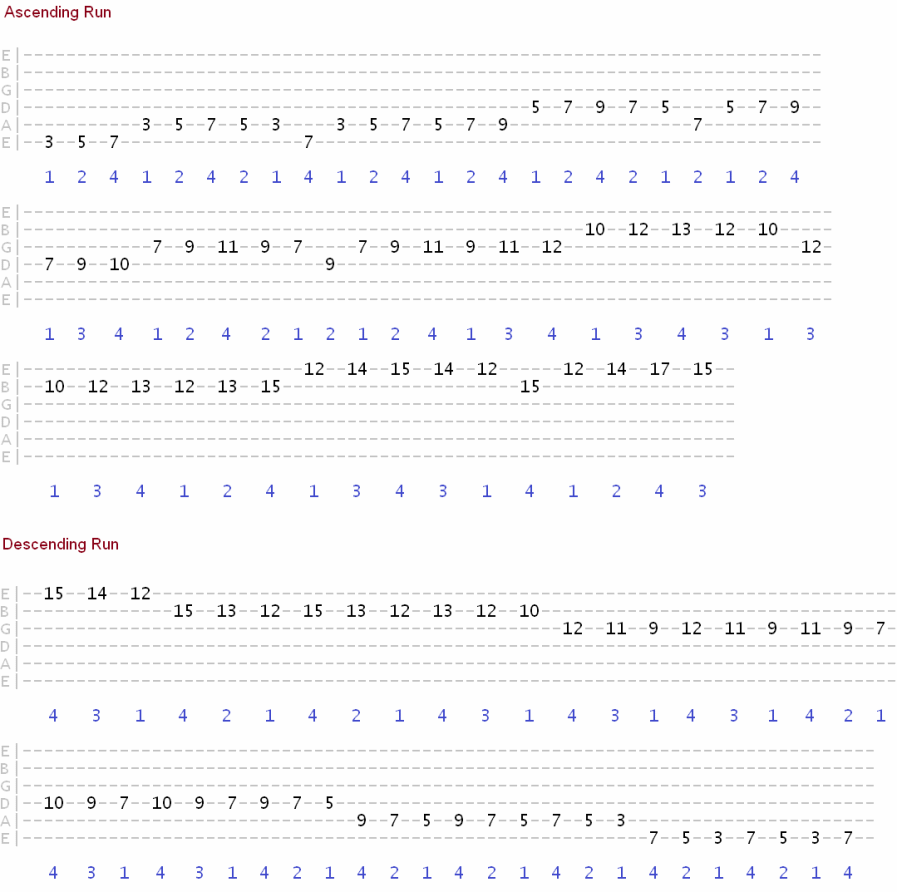
The diagrams and tabs below show you ways in which you can navigate scales across three octaves/twelve frets and beyond, in a single run (if you wish). The result is fast, smooth, melodic movements up and down the neck when you need them.
When learning the pattern, break it up string by string (or octaves if you're able) before combining them into one large run sequence.
You can practice playing through the scales using both alternate picking and legato techniques such as hammer ons and pull offs using the timing exercises below...
Step 1 Start with your metronome at 60 BPM, playing one note on every click/beat (hear it). When you can play comfortably at that tempo, increase the BPM to 70, and then in increments of 10 (or 20) as you get more confident.
Step 2 Once you get to around 200 BPM, wind it back to 60 and try playing eighth notes (2 notes per click - hear it). Again, use small increments to ensure smooth progress. Challenge yourself to reach at least 160 BPM.
Step 3 Again, go back to 60 and try sixteenth notes (4 notes per click - hear it). You'll find this timing far more challenging as you approach the higher tempos. Push it as high as you can/want using the 10 BPM increments. Follow this three step process with discipline and it won't be long before you're able to blitz through the scale in your sleep!
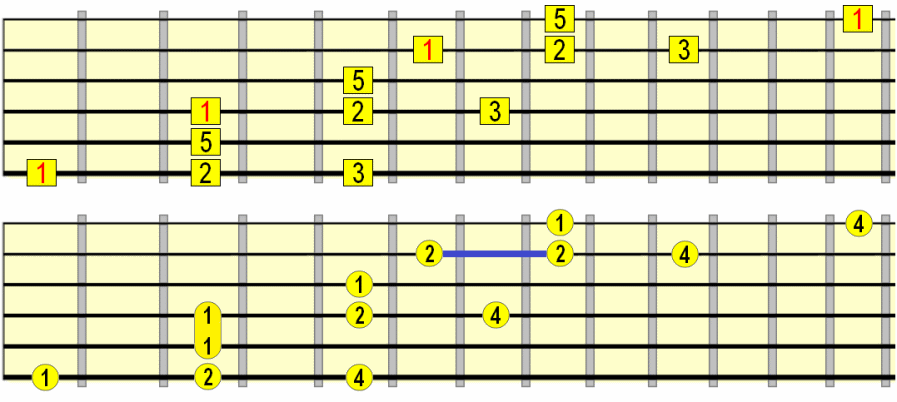
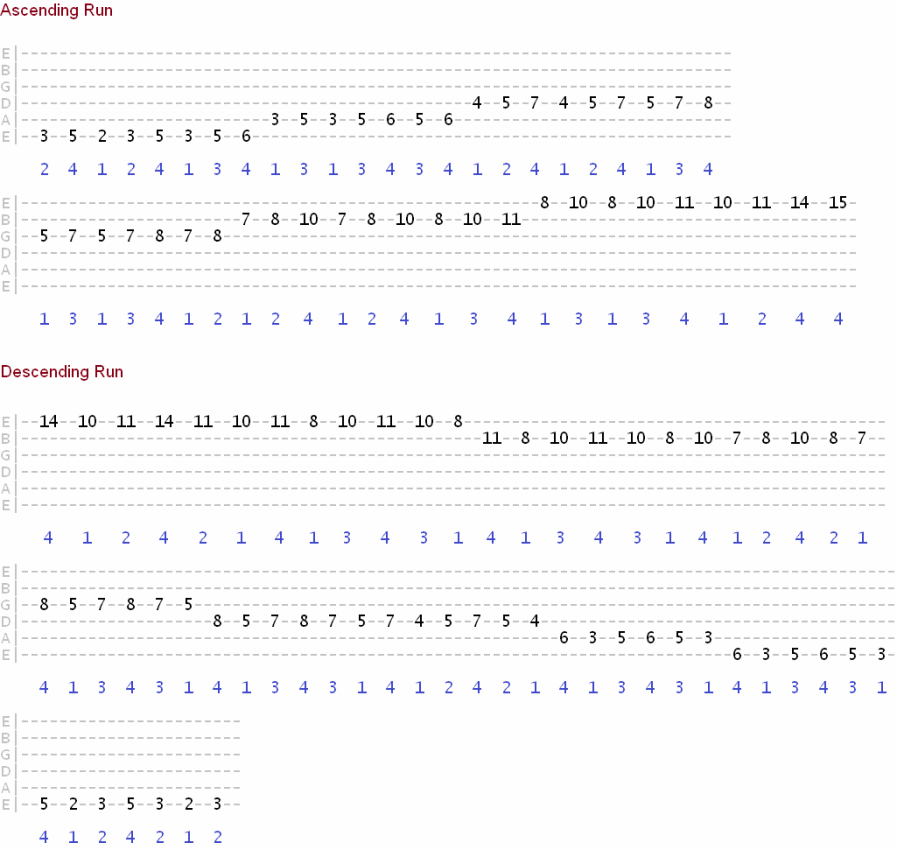
As well as straight runs, you can try more interesting "staggered" runs such as the G major examples below (suggested fingering in blue)...
In this next diagram we skip the 6th tone in the scale, giving us a more arpeggiated run (note the blue line indicates a slide using the 2nd finger)...
Let's try some staggered run exercises in G major...
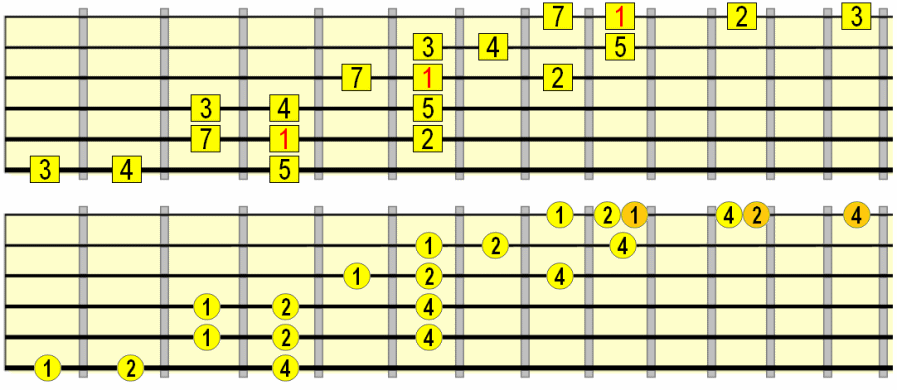
Below I've left out the 6th of the scale which will give us some colourful variation. This time, we're starting and ending on the 3rd of the scale. Adjust the fret positioning accordingly so root (1) notes correspond to the key you're playing in. You can use the previous diagram (the full major scale run) to see where the 3rd on the E string corresponds to the below pattern...
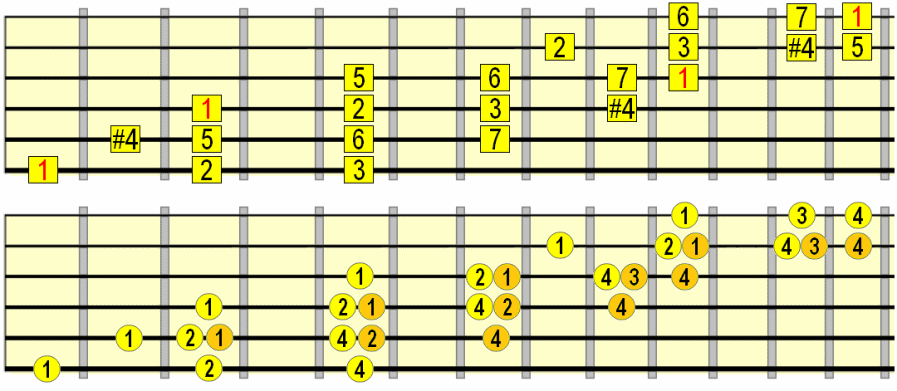
Again, if we "skip" the 6th, all we need to do is raise the 4th from the major scale form. We're starting on the 3rd...
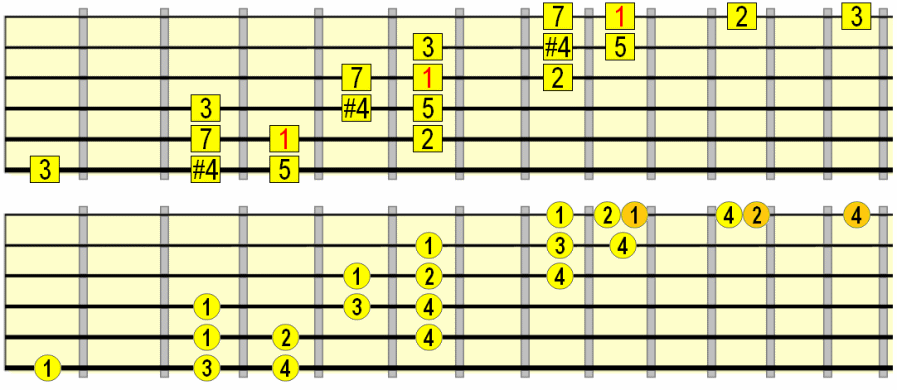
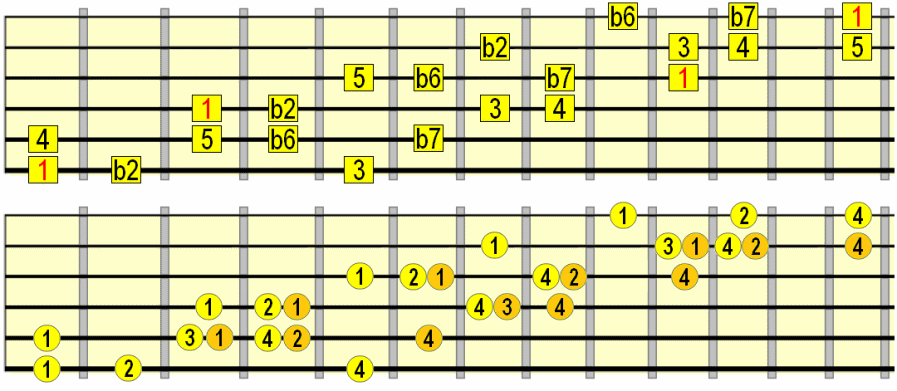
Again, skipping the 6th tone gives us some variation but still retains all the most important harmonic tones of Phrygian...
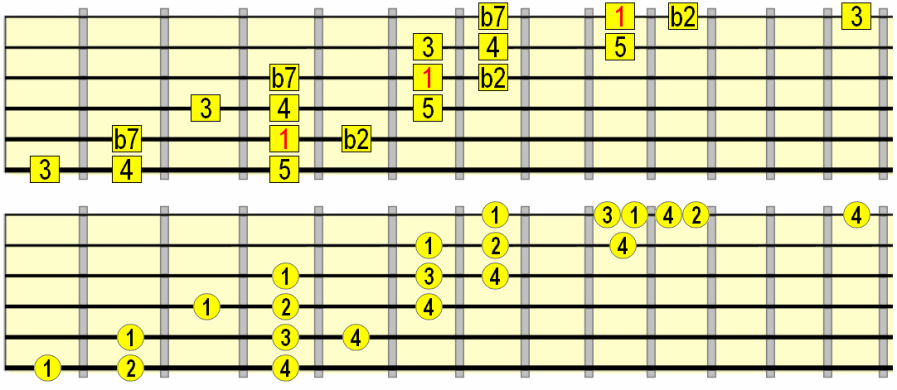
Remember, you don't always have to do a straight run up or down. Try this sequence for the form above (G root)...
Now on to our staple minor scales...
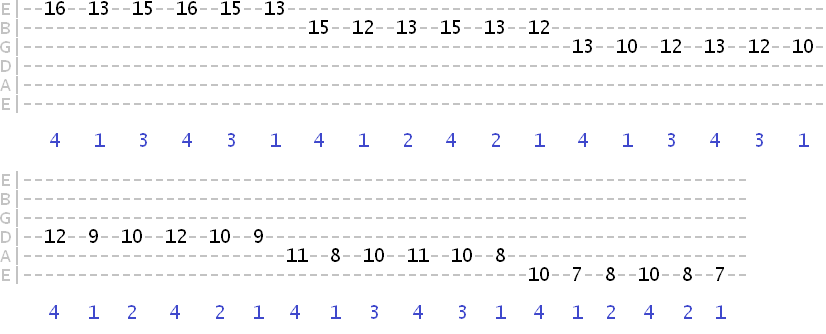
Let's try a couple of runs in G major...
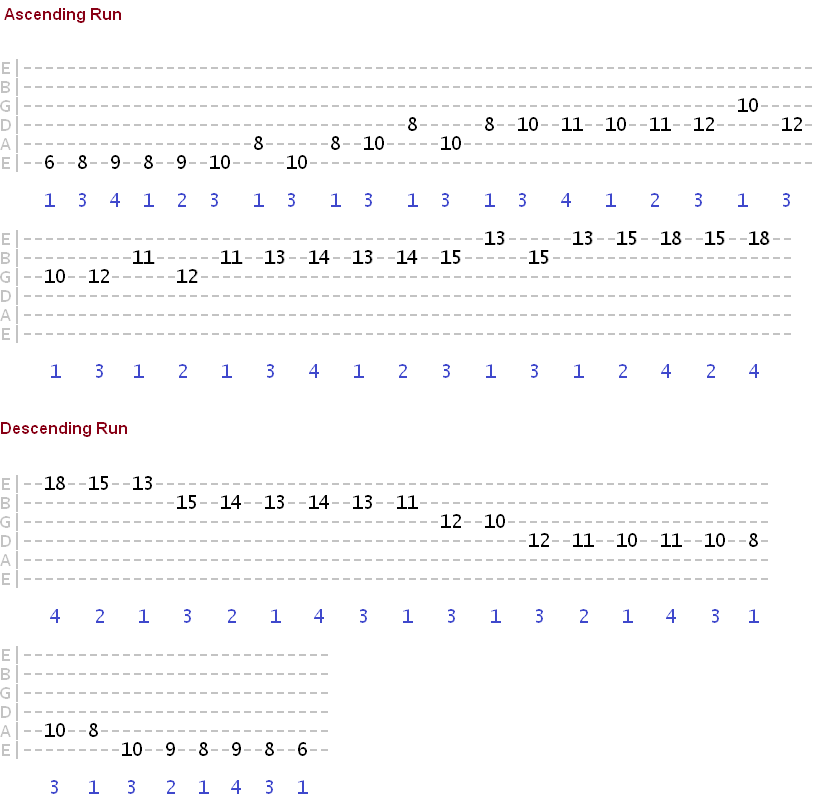
Here I skip two tones from the scale - the b6 and b7 - giving us a more arpeggiated sound...
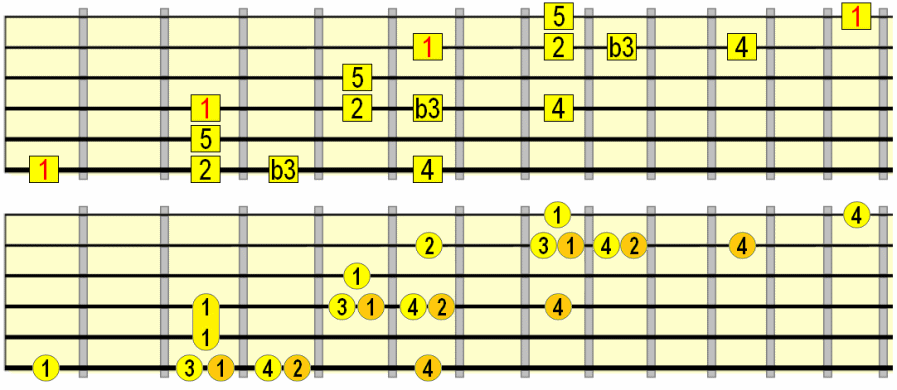
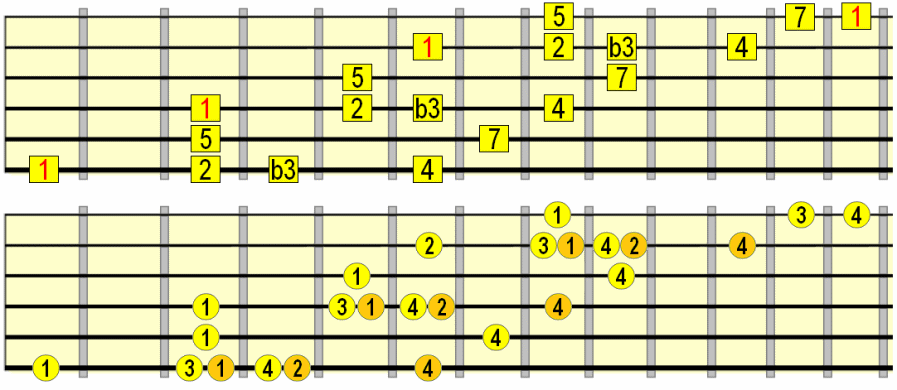
Here are some effective speed building exercises (in G minor) for the above pattern. Break it down into octaves or even string by string to help you learn it...
For some variation, simply add the major 7th (7) to the "skipped" natural minor sequence from earlier...
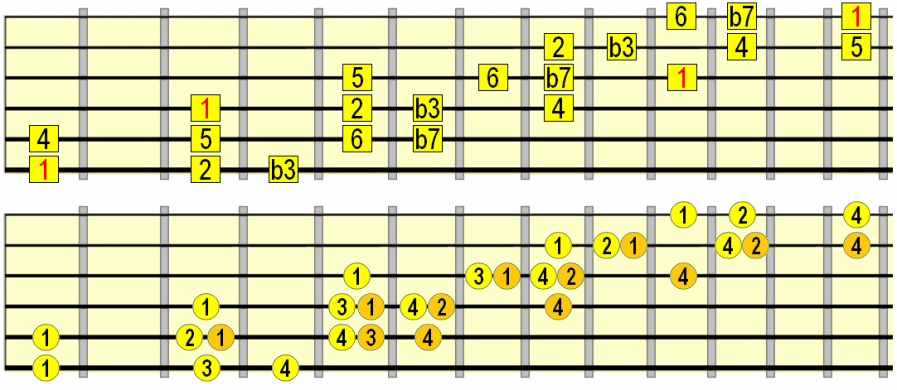
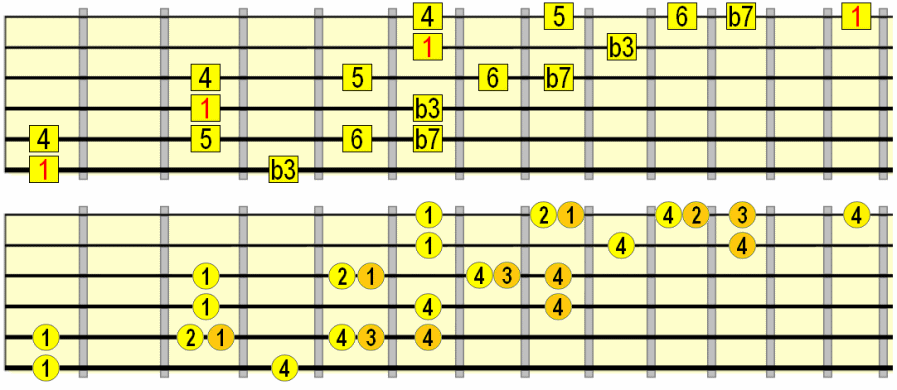
Once again, a skipped tone variation. Here we skip the 2nd, giving us the equivalent of minor pentatonic with an added 6th...
Practice moving in to and out of these runs from/to slower, boxed-in licks.
Think about target notes as you approach the end of your run. The strongest target notes are the chord tones that correspond to the backing chord. For example, if you can learn where the root, 3rd and 5th of the chords you're playing over lie in your patterns, you'll have those "safe" points to punctuate your run. I'll be covering this in more depth in a separate lesson on "tone targetting".
In short, practicing where and how you end your run is just as important as the run itself.
Thanks for your time and effort - keep up your daily practice, even just 30 minutes will ensure good progress.
Share your thoughts...
Have any questions, thoughts or ideas about this lesson? Let us know using the comments form below.
Playing Scales Across The Fretboard Fast, Fluidly & Musically
If you've spent any time learning guitar scales, you'll know the importance of memorizing patterns - the roadmap for playing scales across the fretboard.While you may be familiar with "boxed" and "three notes per string" scale patterns, you soon feel the urge to break out of these narrow limitations and span more of the neck. Knowing how to navigate (and physically endure) these larger roadmaps in a practical sense, musically and fluidly, is a skill in its own right.
This lesson will show you how to span beyond three octaves for a given scale, over a twelve (and more) fret radius, using fingerings that promote speed and fluidity. You could call this "shredding for beginners", because it lays the fret-hand groundwork for fast, yet melodic runs...
Three-Octave Scale Patterns
While the smaller scale patterns you learn in those early stages are crucial in helping you explore a scale's sound, they are quite limiting in terms of how they box you in on the guitar neck. By unboxing your scale playing, you can ascend or descend into pitches that would have otherwise been "out of bounds". It also allows for more free flowing, fluid movements up and down the fretboard.The diagrams and tabs below show you ways in which you can navigate scales across three octaves/twelve frets and beyond, in a single run (if you wish). The result is fast, smooth, melodic movements up and down the neck when you need them.
How to practice these scale forms
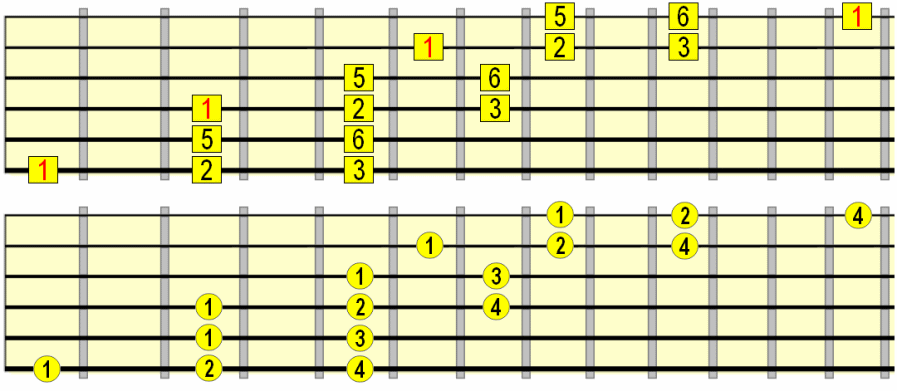
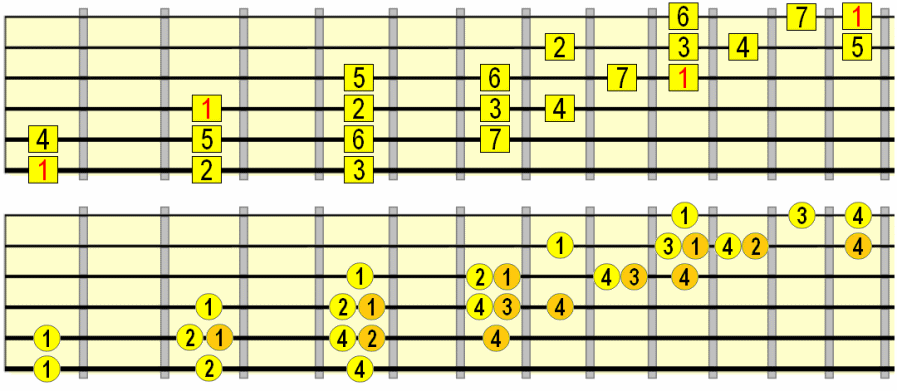
The patterns below are not specific to a particular key (although I use the example of G in the video - start with this). Position the root (1) on the appropriate note/fret for the key in which you want to play the scale. I advise practicing these run patterns in several keys (e.g. E, F, G, A, B etc.) to help you internalize them.When learning the pattern, break it up string by string (or octaves if you're able) before combining them into one large run sequence.
You can practice playing through the scales using both alternate picking and legato techniques such as hammer ons and pull offs using the timing exercises below...
Step 1 Start with your metronome at 60 BPM, playing one note on every click/beat (hear it). When you can play comfortably at that tempo, increase the BPM to 70, and then in increments of 10 (or 20) as you get more confident.
Step 2 Once you get to around 200 BPM, wind it back to 60 and try playing eighth notes (2 notes per click - hear it). Again, use small increments to ensure smooth progress. Challenge yourself to reach at least 160 BPM.
Step 3 Again, go back to 60 and try sixteenth notes (4 notes per click - hear it). You'll find this timing far more challenging as you approach the higher tempos. Push it as high as you can/want using the 10 BPM increments. Follow this three step process with discipline and it won't be long before you're able to blitz through the scale in your sleep!
Major Pentatonic
The first diagram shows the intervals, the second shows the suggested fingering (you can change this if needed).
As well as straight runs, you can try more interesting "staggered" runs such as the G major examples below (suggested fingering in blue)...

In this next diagram we skip the 6th tone in the scale, giving us a more arpeggiated run (note the blue line indicates a slide using the 2nd finger)...

Major Scale
As shown in the video, because we have to shift our 3-note fingering on each string, we'll essentially be assigning two fingers to some frets. So, moving up the sequence, where there are two fingering labels on a fret, start with the three note sequence on the left-hand labels and then shift to the right-hand labels. I hope this isn't too confusing (I couldn't think of a better way to label it)! If in doubt, watch the video as the fingering is sequentially mapped out.
Let's try some staggered run exercises in G major...

Below I've left out the 6th of the scale which will give us some colourful variation. This time, we're starting and ending on the 3rd of the scale. Adjust the fret positioning accordingly so root (1) notes correspond to the key you're playing in. You can use the previous diagram (the full major scale run) to see where the 3rd on the E string corresponds to the below pattern...

Lydian
A very pretty scale over major chords, defined by the augmented 4th (#4) interval. In relation to the major scale, we simply sharpen the 4th to get Lydian...
Again, if we "skip" the 6th, all we need to do is raise the 4th from the major scale form. We're starting on the 3rd...

Phrygian Dominant
A more "exotic" sounding major scale (used a lot in metal), great for longer runs due to its rich tonality. Phrygian dominant is the 5th mode of harmonic minor (see the minor scales further down), so you can visualise the root of Phrygian as starting on the 5th note of a harmonic minor pattern or harmonic minor starting on the 4th note of a Phrygian pattern...
Again, skipping the 6th tone gives us some variation but still retains all the most important harmonic tones of Phrygian...

Remember, you don't always have to do a straight run up or down. Try this sequence for the form above (G root)...

Now on to our staple minor scales...
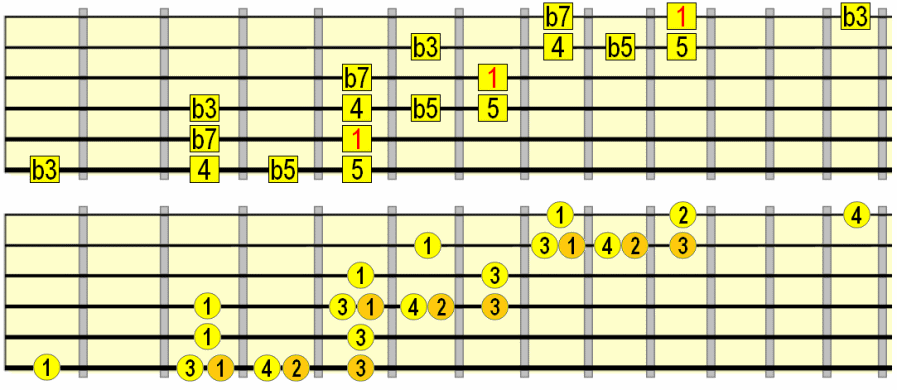
Minor Pentatonic (including b5 "blue" note)
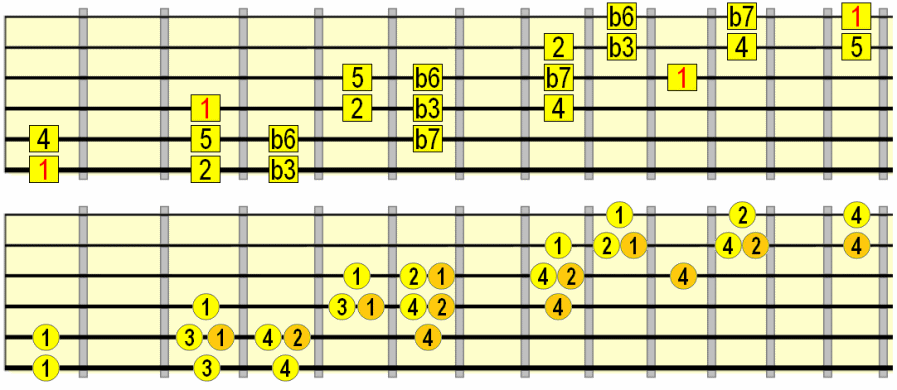
Typically played in its boxed form, if we move to the minor 3rd (b3) of the scale, we can get into position for a flowing, bluesy, three-octave run...
Let's try a couple of runs in G major...

Natural Minor
Most minor key songs are contained within this scale. See if you can build your own run sequence similar to the major scale exercises...
Here I skip two tones from the scale - the b6 and b7 - giving us a more arpeggiated sound...

Harmonic Minor
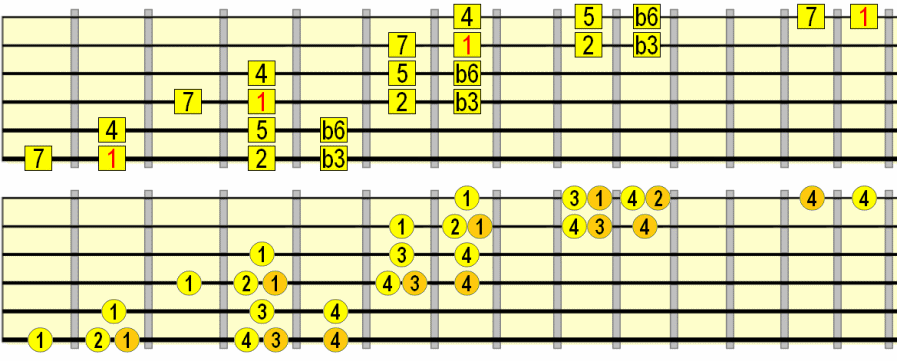
The only difference between natural and harmonic minor is the 7th. We simply raise the 7th by a semitone, giving us that neo-classical minor sound used by many metal and shred players. A bit more of a stretch for that pinky on some strings...
Here are some effective speed building exercises (in G minor) for the above pattern. Break it down into octaves or even string by string to help you learn it...

For some variation, simply add the major 7th (7) to the "skipped" natural minor sequence from earlier...

Dorian
Raise the 6th of natural minor to get Dorian...
Once again, a skipped tone variation. Here we skip the 2nd, giving us the equivalent of minor pentatonic with an added 6th...

Once You've Learned The Patterns...
While many solos, especially in the heavier musical styles, involve these drawn out runs across the fretboard, it's important to practice combining them with more articulated, improvised licks and phrases, to give your solos variation. While it may be tempting (and fun) to use your newly learned skills to blitz up and down the neck, people listening will want to occasionally hear more nuanced musical expression.Practice moving in to and out of these runs from/to slower, boxed-in licks.
Think about target notes as you approach the end of your run. The strongest target notes are the chord tones that correspond to the backing chord. For example, if you can learn where the root, 3rd and 5th of the chords you're playing over lie in your patterns, you'll have those "safe" points to punctuate your run. I'll be covering this in more depth in a separate lesson on "tone targetting".
In short, practicing where and how you end your run is just as important as the run itself.
Thanks for your time and effort - keep up your daily practice, even just 30 minutes will ensure good progress.
| Was this
helpful? Please support this site. I really appreciate it! |
Stay updated
and learn more Sign up to the newsletter for updates and grab your free Uncommon Chords book |
Share your thoughts...
Have any questions, thoughts or ideas about this lesson? Let us know using the comments form below.


