Home
> Progressions
/ Theory
> Transposing Chords
Transposition may be done for a number reasons, but the main benefit of
knowing how to transpose chords is the ability to to shift a chord
progression into a register that's more comfortable for the vocalist
(which may, of course, be you!).
It also means you'll be able to play a progression in a key that allows you to use certain chord voicings/fingerings that would be unavailable in other keys (for example, open chords which can only be played in one position).
Now, if you study the chord progressions section, you'll naturally develop the skill for transposing, eventually by ear, but this lesson will show you some really quick and simple ways to transpose guitar chords without any in depth knowledge of theory.
In other words, this is a more practical guide to chord transposition!
That alone might tell you all you need to know! If not, follow the process below...
Cmaj / Am / Fmaj / Dm
Of course, these chords could be more complex than that (e.g. Cadd9, Am9, Fmaj7, Dm7), but the process remains the same. It's the chord root (letter) we're focusing on here...
C / A / F / D
These are the root notes of the chords. We'll be referencing these throughout the process...
It doesn't matter where you were playing the chords in the original key, this step is purely for easy visualisation. In order for you to visualise these notes as a single, movable unit, they ideally need to be grouped as close together as possible.
Using the example above, I would locate the root notes on the fretboard as follows...
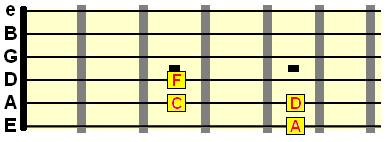
It might help you to number these root notes in your mind (or even better, scribble it down - it'll only take a minute) so you remember the order in which the notes/chords occured in the progression. 1 = Cmaj, 2 = Am etc.
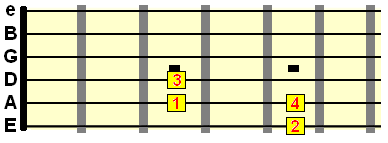
We now have a unit of root notes we can move up or down the fretboard to the desired pitch. This will become our new key when we rebuild the chords on their root notes.
As C major was our tonic chord, the new key will be determined by where that C note ends up. In reality, it doesn't really matter if you don't know what the tonic chord or even the original key is, as your ear will determine whether you want the overall progression to be higher or lower in pitch.
I'm first going to try shifting it up a whole step. This is the equivalent of two frets. Whatever interval you move the root notes, make sure they're moved as a unit. Move them one at a time if you find it easier...

If there is a specific key you want to move them to, simply move the tonic chord root (that's C in this example) to the new key's root (e.g. C major to D major would mean you move the tonic chord root from C to D). Count the number of frets you've moved it and move the other related chords by that same interval.
Even if the reason for changing key was so you could play a particular voicing of one of the chords (not necessarily the tonic), move that chord's root note into position first and then move the other chords by the same interval.
The unit should look exactly the same, but in a new position on the fretboard.

In my example, the new root notes have been moved as follows...
C - D / A - B / F - G / D - E
From our knowledge of what the chords were in the original key, we can apply the same extensions to the new chord root notes...
Cmaj - Dmaj / Am - Bm / Fmaj - Gmaj / Dm - Em
Now, you can either play these chords as simple barre chords, using those same root note positions, or you can find those root notes in other positions on the fretboard and play the chord voicing there.
For example, if you know your basic open position chords, you'll know that Dmaj, Gmaj and Em can be played using open string root notes. You can also built chord shapes on their E, A and D string root notes (this was covered in the barre chords series).
So this lesson does not teach you where to play the chords in their new key, as there are countless possibilites for this, it just shows you the process for finding out what the chord root notes are in the new key. You're then free to build the new chords where you wish.
If in doubt, just play the chords around the root note unit you shifted up/down the fretboard and as your chord library develops you'll naturally learn how to play the same chord in several positions/voicings.
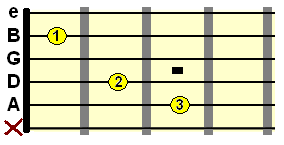
For example, an open C major chord...
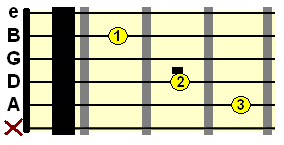
Becomes an open C# major chord with the capo at the 1st fret...
The below table shows you what these common open chord forms become with a capo applied at each fret. Remember, these also apply to minor, 7th and other variations on the open chords - it's the root of the chord that determines its pitch.
For example, you can tune down a whole step...
E A D G B e becomes D G C F A d
So playing those familiar open position chords...
Amaj / Em / Dmaj would become Gmaj / Dm / Cmaj
Warning: don't tune UP more than a whole step as you risk breaking your strings and/or putting too much tension on the guitar neck!
Again, this method is really only useful for non-movable chord shapes/voicings (e.g. chords that use open strings) that would be unattainable in standard tuning.
Like I said at the beginning of the lesson, as you delve more into music theory, you'll naturally learn how to transpose guitar chords as part of the process. However, the above methods will still be useful to support this knowledge.
Guitar Chord Progressions
Guitar Theory Lessons
How to Transpose Guitar Chords Easily
At some point, you'll need to know how to transpose guitar chords. In a nutshell, this is where you move an entire progression (sequence of chords) from one key to another, keeping the same overall interval structure of the sequence.
 |
It also means you'll be able to play a progression in a key that allows you to use certain chord voicings/fingerings that would be unavailable in other keys (for example, open chords which can only be played in one position).
Now, if you study the chord progressions section, you'll naturally develop the skill for transposing, eventually by ear, but this lesson will show you some really quick and simple ways to transpose guitar chords without any in depth knowledge of theory.
In other words, this is a more practical guide to chord transposition!
Using root note units to transpose guitar chords
Chords can be visualised on the fretboard in a number of ways, but the following method specifically takes the root (1) notes of chords in a progression to create a visual relationship, or unit, we can shift up or down the fretboard to the desired key.That alone might tell you all you need to know! If not, follow the process below...
Step 1 - identify the chords in the progression
Let's say the chord progression is as follows...Cmaj / Am / Fmaj / Dm
Of course, these chords could be more complex than that (e.g. Cadd9, Am9, Fmaj7, Dm7), but the process remains the same. It's the chord root (letter) we're focusing on here...
C / A / F / D
These are the root notes of the chords. We'll be referencing these throughout the process...
Step 2 - identify the chord root notes on the fretboard
The key thing here is to group these root notes as close together as you can, using those bottom 3 strings (E, A, D). This requires knowledge of the notes on the fretboard (which was covered in the preliminary guitar fretboard lessons).It doesn't matter where you were playing the chords in the original key, this step is purely for easy visualisation. In order for you to visualise these notes as a single, movable unit, they ideally need to be grouped as close together as possible.
Using the example above, I would locate the root notes on the fretboard as follows...

It might help you to number these root notes in your mind (or even better, scribble it down - it'll only take a minute) so you remember the order in which the notes/chords occured in the progression. 1 = Cmaj, 2 = Am etc.

We now have a unit of root notes we can move up or down the fretboard to the desired pitch. This will become our new key when we rebuild the chords on their root notes.
As C major was our tonic chord, the new key will be determined by where that C note ends up. In reality, it doesn't really matter if you don't know what the tonic chord or even the original key is, as your ear will determine whether you want the overall progression to be higher or lower in pitch.
Step 3 - move the root note unit to the desired pitch
For this example, I want to make the chord progression higher in pitch as some of the notes I was singing in the original key were too low (singing in a higher register can command more vocal presence... this is a whole other lesson!).I'm first going to try shifting it up a whole step. This is the equivalent of two frets. Whatever interval you move the root notes, make sure they're moved as a unit. Move them one at a time if you find it easier...

If there is a specific key you want to move them to, simply move the tonic chord root (that's C in this example) to the new key's root (e.g. C major to D major would mean you move the tonic chord root from C to D). Count the number of frets you've moved it and move the other related chords by that same interval.
Even if the reason for changing key was so you could play a particular voicing of one of the chords (not necessarily the tonic), move that chord's root note into position first and then move the other chords by the same interval.
The unit should look exactly the same, but in a new position on the fretboard.

Step 4 - rebuild the chords in the new key
Now we've transposed the chord root notes, we can identify what these new root notes are (again, you need to know the notes on the fretboard to do this).In my example, the new root notes have been moved as follows...
C - D / A - B / F - G / D - E
From our knowledge of what the chords were in the original key, we can apply the same extensions to the new chord root notes...
Cmaj - Dmaj / Am - Bm / Fmaj - Gmaj / Dm - Em
Now, you can either play these chords as simple barre chords, using those same root note positions, or you can find those root notes in other positions on the fretboard and play the chord voicing there.
For example, if you know your basic open position chords, you'll know that Dmaj, Gmaj and Em can be played using open string root notes. You can also built chord shapes on their E, A and D string root notes (this was covered in the barre chords series).
So this lesson does not teach you where to play the chords in their new key, as there are countless possibilites for this, it just shows you the process for finding out what the chord root notes are in the new key. You're then free to build the new chords where you wish.
If in doubt, just play the chords around the root note unit you shifted up/down the fretboard and as your chord library develops you'll naturally learn how to play the same chord in several positions/voicings.
Transposing guitar chords using a capo
Many guitarists prefer to use a capo to transpose guitar chords. The benefit of using a capo is you can keep the same chord shapes (e.g. open chords) and therefore the same chord fingerings and voicings by effectively moving the nut of your guitar to a new fret.For example, an open C major chord...

Becomes an open C# major chord with the capo at the 1st fret...

The below table shows you what these common open chord forms become with a capo applied at each fret. Remember, these also apply to minor, 7th and other variations on the open chords - it's the root of the chord that determines its pitch.
| Open | 1st | 2nd | 3rd | 4th | 5th | 6th | 7th | 8th |
| Emaj | Fmaj | F#maj | Gmaj | Abmaj | Amaj | Bbmaj | Bmaj | Cmaj |
| Gmaj | Abmaj | Amaj | Bbmaj | Bmaj | Cmaj | C#maj | Dmaj | Ebmaj |
| Amaj | Bbmaj | Bmaj | Cmaj | C#maj | Dmaj | Ebmaj | Emaj | Fmaj |
| Cmaj | C#maj | Dmaj | Ebmaj | Emaj | Fmaj | F#maj | Gmaj | Abmaj |
| Dmaj | Ebmaj | Emaj | Fmaj | F#maj | Gmaj | Abmaj | Amaj | Bbmaj |
Use alternate tunings to transpose guitar chords
You can play chord progressions in a different key by tuning up or down from standard tuning. This method is only for transposing by small intervals (e.g. a whole step) up or down, although with thicker gauge strings you can tune lower.For example, you can tune down a whole step...
E A D G B e becomes D G C F A d
So playing those familiar open position chords...
Amaj / Em / Dmaj would become Gmaj / Dm / Cmaj
Warning: don't tune UP more than a whole step as you risk breaking your strings and/or putting too much tension on the guitar neck!
Again, this method is really only useful for non-movable chord shapes/voicings (e.g. chords that use open strings) that would be unattainable in standard tuning.
Like I said at the beginning of the lesson, as you delve more into music theory, you'll naturally learn how to transpose guitar chords as part of the process. However, the above methods will still be useful to support this knowledge.
| |
Tweet |
Stay updated and learn more
Sign up to the newsletter for updates and grab your free Uncommon Chords book
Sign up to the newsletter for updates and grab your free Uncommon Chords book
Related
Guitar Chord Progressions
Guitar Theory Lessons


