At first, you'll find that fingering barre chords is difficult and even painful.
This is perfectly normal. Like with so many things, it just takes a little time and persistence to build enough strength and muscle memory in your barre finger to be able to play the chords without thinking or adjustment.
Be reassured that, no matter how difficult barre chords may seem right now, with enough practice they'll eventually be as easy to play as any other chords you've learned.
However, many players are causing themselves more pain and frustration than necessary! Follow the steps below to ensure you're fingering your barre chords in the optimal way.
The following steps apply to all
the main barre chord shapes.
1. Position the Barre to Find the Sweet Spot
If you've tried barre chords but your finger feels weak or very painful, it may just be that your positioning is slightly off. There's a sweet spot to be found between the joints and contours of your barre finger. Here's how to find it...
First, barre your index finger across all six strings at the 5th fret. Why the 5th fret? Because there's less tension and more leverage in the strings higher up the fretboard, helping you to ease into position with minimal pain!
When starting out, you won't know the exact position that will get the best results. There's a "sweet spot" to be found here and it's different for everyone (since we're all built differently).
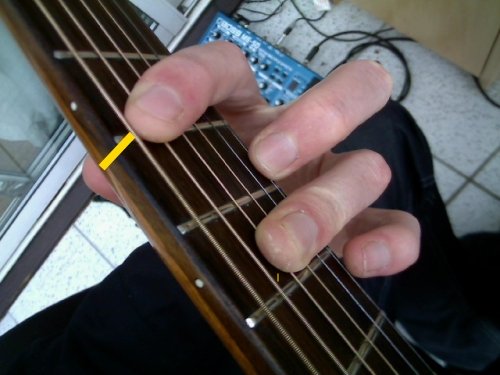
Start by replicating (as close as you can) what you see in the photo...
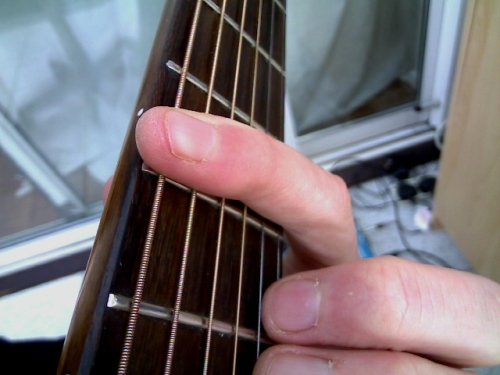
Notice how the barred finger is snug next to the fret wire (not on the wire). This will ensure the strings are firmly against the fret wire and sound as cleanly as possible, with the least amount of pressure required from your finger.
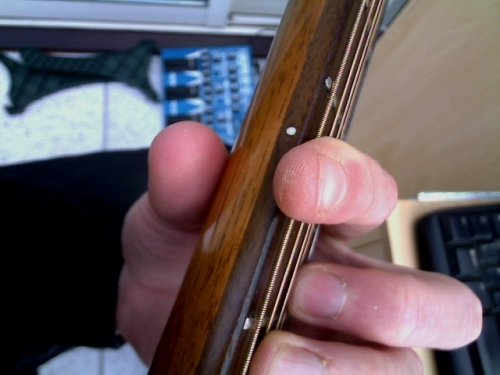
The barre finger isn't absolutely flat against the strings. It's ever so slightly angled towards the nut, so you're using more of the side of your finger. If you're struggling to apply the required pressure, try turning the finger a bit more so you're using the side of it.
See also how my finger just peeps over the edge of the neck, ensuring
the
6th string (bass) is fretted with the pad of the finger tip.
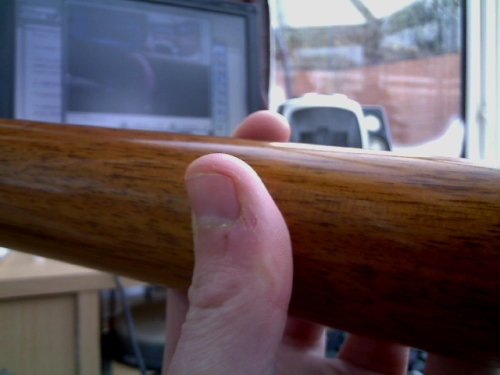
Note the thumb position - from the center to top edge of the neck and in line with the barre finger (pictured below), almost as if the the tips of your thumb and index finger would meet if the neck wasn't there.
This will ensure the strongest support and leverage for the barre finger and should keep those aches and pains to a minimum (although you're going to have to grin and bare some pain at first).
Here's another perspective. You can also see the slight angling of the barre finger towards the side as mentioned earlier...
Now try picking each string one by one. Do they sound cleanly, without buzzing?
Can you hear any obstruction? You likely will at first. Not to worry - just try ever so slightly repositioning the barre. Maybe move it vertically up or down a touch (keep it positioned against the fret wire though).
Also try rotating your barre finger slightly so you're barring more with the side of your finger than the flat. Some players find it easier to fret all the strings that way.
Players with longer fingers may prefer to use the middle
and base of their finger to create the barre.
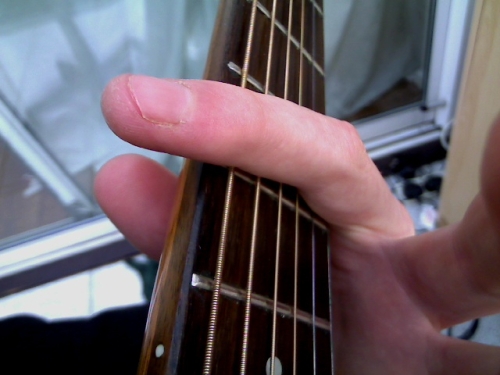
So the key is experimentation through minor adjustments.
Once you find that sweet spot (it may take some time - be patient!),
and you're happy that all six strings are sounding cleanly and clearly,
it's time to work on developing your muscle memory so that you
automatically move into that same position every time you go to barre.
2. Set In the Muscle Memory
To exercise this muscle memory, practice lifting off and reapplying the barre.
Try adding and releasing pressure with the barre on the fretboard - kind of like doing push ups for your finger! Fret the strings, release, fret, release etc.
Keep picking the strings to check you're still positioned in that sweet spot and they're resonating cleanly.
You need to have a lot of patience with this. There's
no short cut. Try not to get frustrated if you don't see immediate
progress.
3. Test Your Barre Movement and Add In Other Fingers
Try barring your index finger on other frets, both further up and down the neck. The 1st fret will probably be the hardest for you, but it's where you'll be playing common chords such F major, so it's important to get it.
Move between random frets with your barre finger and get comfortable with lifting off, moving and immediately fretting the strings at another fret.
Add in the other fingers in the shape when you're ready. By focusing solely on your barre finger strength to begin with, you'll now find it much easier to create the rest of the shape.
Start moving the full shape up and down the neck. Make it more fun by
creating your own chord sequences just using that chord shape
(both major and minor variations).
4. Repeat Steps 1-3 for the A and C Shapes
Exactly the same process applies, the only difference being we're barring fewer strings.
Remember
to keep your thumb in line with the index finger. Even if you're using
your
ring finger
as the barre for major A shape chords, the thumb should
still be in line with the index
finger...
5. Practice Changing Between Barre Chord Shapes
This is where you really cement that muscle memory. Play between combinations of the different barre chord shapes and throw in some open chords (or any other chord shape you know) occasionally. Keep it fun by writing a simple song from the chord changes.
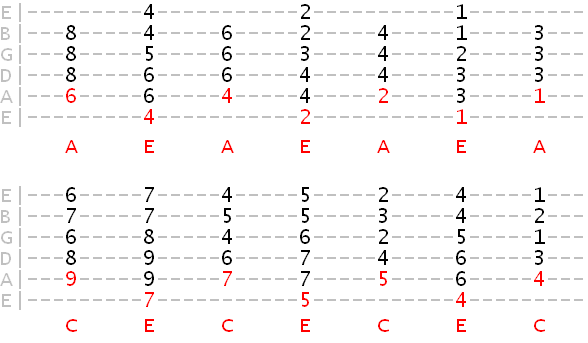
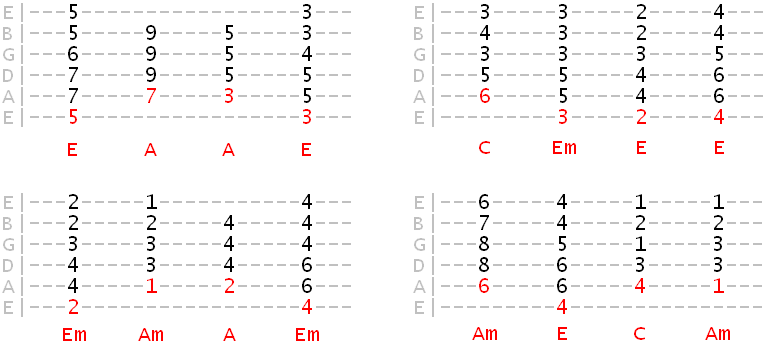
Here are some exercises to get you started. The red numbers indicate the bass root fret of the shape, and the letter underneath is the shape itself (E = E shape, A = A shape, Am = A minor shape etc.)
Starting with some "circle of 5ths" sequences between two shapes...
Now for some sequences you're more likely to hear in a song...
Try and come up with your own exercises. Challenge yourself for 20 or so minutes every day!
There'll be more barre chord exercises in a separate lesson. If you still need help with barre chords, I highly recommend Jonathan Boettcher's Bar Chords Made Simple - he'll sort you out!
