Note Pattern Diagrams
In a moment we'll look at some fretboard diagrams to see how the six strings relate to each other.
Assuming you've learned the notes on the lowest two strings, this shouldn't take too long to master, and what you end up with is the ability to shift these visual relationships (patterns) up and down the neck.
So just bear in mind that these diagrams apply to any position up and down the fretboard. In other words, these patterns are movable and to be positioned on the note you're playing...
1st, 4th and 6th Strings
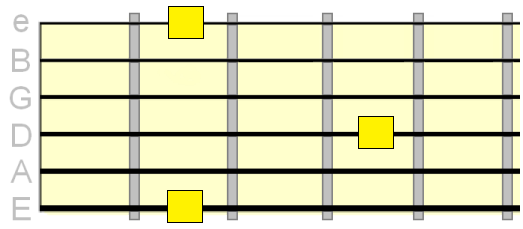
Position the pattern in the diagram below at any fret. As long as you
keep the formation of notes as presented, they will all be the same note...
 All the same note!
We established in earlier lessons that, at any given fret, the 1st string is the same note as the 6th string.
So if you were at the 2nd fret, for example, you should know that the 6th string would be the note F♯, therefore the high E string at the 2nd fret would also be the note F♯.
Right away then, if you've learned the 6th string notes, you'll automatically know the 1st string notes.
The other related string in that diagram is the 4th string. Look at its position in relation to the 1st and 6th string - it's two frets higher. So if you fretted the 4th string at the 4th fret it would be the note F♯ because the 1st/6th string in their related position would be at the 2nd fret, which you'd know is also F♯.
Try it - play that pattern above anywhere on the fretboard. As long as you keep that formation of notes, they're the same note.
2nd, 3rd and 5th Strings
Again, you should
have already learned all the notes along the 5th string. So we can use
this string as our "starting point" for the next pattern...

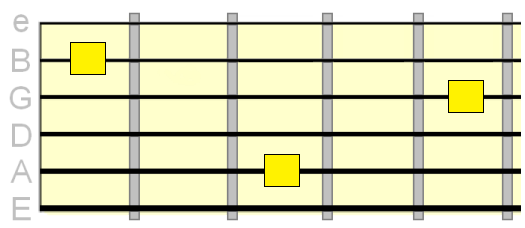
Once again, look at the visual relationship between those three strings - they're all the same note.
The 2nd string note is two frets below the same note on the 5th string and four frets below the same note on the 3rd string.
Or, you could see the 3rd string note as two frets higher than the same note on the 5th string.
1st, 2nd, 4th and 6th Strings
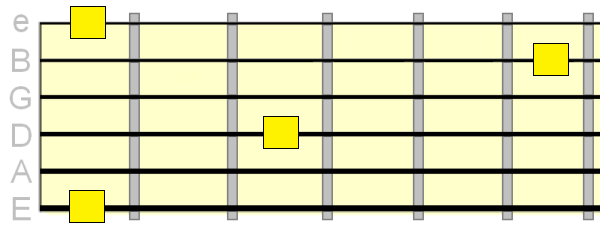
The below diagram links the previous diagrams together. Can you see where?

Again, all the same note.
The note positions on the 1st, 4th and 6th strings we learned from the first diagram in this lesson.
The 2nd string position we learned from the second diagram, so we're in effect linking those first two diagrams together.
The link between the two patterns is made between the 2nd string and 4th string positions - they're three frets apart.
1st, 3rd, 5th and 6th Strings

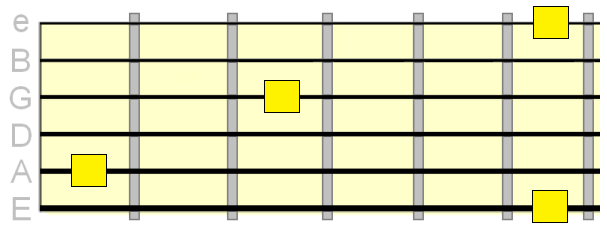
Notice anything familiar in the diagram above? Namely the relationship between the 3rd and 5th strings and the 1st and 6th strings? We've just linked these together.
The 3rd string position lies three frets below the 1st and 6th string positions.
Then, once you know the note on the 3rd string, you also know how the 5th string relates to that from the second diagram!
Linking the Patterns Together
Work on all four patterns above. If you
were to play the note C,
for example,
you should be able to visualize it in all its positions based on the
movable patterns we learned...

You can hopefully pick out those individual patterns we learned. It's just a case of linking them together and practicing until you can move between the positions almost without thinking. It won't take long to get to that stage - start with 10 minutes a day, choosing a different note every time.
Try another one... find all the note positions (including beyond the 12th fret) for G
The tab below has the answer...

So What's the Real Benefit of All This?
Being able to locate the same note on multiple strings instantly frees up your playing. You'll be able to jump to different parts of the fretboard for any note without guess work.
For example, you might think "I need a higher sounding B note" or a "lower sounding 3rd" (you'll know what "a 3rd" is soon enough!). The patterns we've learned here will give you those signposts.
It's one of those skills you grow to appreciate the more you progress.
Thanks for your patience!
